Your shopping cart is empty!
Swede "Wilhelmsburger" (Rutabaga, Swedish turnip) (50 g)
 (50 g)")
Prof Pack
 (50 g)")
Brassica napus L. var. napobrassica
6.13€
Ex Tax: 4.95€
Ex Tax: 4.95€
Rutabaga "Wilhelmsburger" (Swede).
A mid-early variety (90-110 days), high-yielding, and amazingly well-suited for long-term storage.
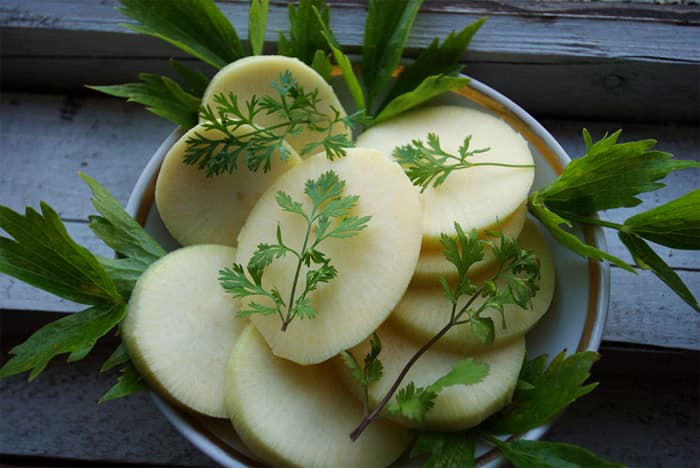
The root crop is round-elongated, up to 10 cm long and 8-15 cm in diameter, weighing 350-600 g. The color in the upper part (about 2/3) is light green, and yellow at the bottom.
The flesh is creamy yellow, juicy, and firm. Taste qualities are excellent. Well adapted to growing in cold climates.
The closest competitor to this variety of table rutabaga is "Krasnoselskaya".
Sowing: in early May with seeds into the ground to a depth of 1.5 cm using a 5x45 cm scheme. The best soils are light loams, slightly acidic soils, rich in humus.
Observe crop rotation when sowing. The optimal temperature for growth and development is +15...+18°C.
Care: thinning at intervals of 15-20 cm, watering, loosening the row spacing.
Harvesting: in late August - early September, trimming the tops.
1.0 g = 300-350 seeds.
A mid-early variety (90-110 days), high-yielding, and amazingly well-suited for long-term storage.
The root crop is round-elongated, up to 10 cm long and 8-15 cm in diameter, weighing 350-600 g. The color in the upper part (about 2/3) is light green, and yellow at the bottom.
The flesh is creamy yellow, juicy, and firm. Taste qualities are excellent. Well adapted to growing in cold climates.
The closest competitor to this variety of table rutabaga is "Krasnoselskaya".
Sowing: in early May with seeds into the ground to a depth of 1.5 cm using a 5x45 cm scheme. The best soils are light loams, slightly acidic soils, rich in humus.
Observe crop rotation when sowing. The optimal temperature for growth and development is +15...+18°C.
Care: thinning at intervals of 15-20 cm, watering, loosening the row spacing.
Harvesting: in late August - early September, trimming the tops.
1.0 g = 300-350 seeds.
* Soil and nutrient requirements.
Rutabaga can yield a good harvest on soils of various mechanical compositions, but loamy soils rich in humus and calcium, especially those in the floodplains of small rivers, are more suitable for it. It grows well on heavy clay soils and is capable of growing on well-cultivated peaty areas. Uncultivated, very acidic, poor dry sandy and gravelly soils are unsuitable for it.
For good growth, rutabaga requires the presence of all essential nutrients in the soil. It absorbs a lot of calcium from the soil, which is necessary for building the cells of the root crops and is one of the main nutrients. In addition, liming increases plant resistance to clubroot.
Nitrogen is part of organic compounds especially important for plants – proteins, chlorophyll, and others; it is necessary for rutabaga from the beginning of its life, as it promotes leaf formation and obtaining a good harvest of root crops. It ensures a high yield in a shorter period of time and increases protein content. However, when applied in excess, the dry matter, sugar, and vitamin C content in root crops decreases, the keeping quality of root crops deteriorates, the overgrowth of the crown intensifies, resistance to rot decreases, and more hollow root crops are formed.
Phosphorus is part of the proteins of the cell nucleus, regulates metabolism, and helps increase the sugar content of root crops. It begins to be absorbed by rutabaga roots from the very beginning of seed germination. Therefore, it is necessary to provide rutabaga with this nutrient in abundance already during the basic fertilization of the soil.
Potassium is of great importance in plant photosynthesis, affects the outflow of carbohydrates from leaves to root crops, therefore, just like phosphorus, it promotes the accumulation of sugar in root crops, which increases resistance to many diseases. Rutabaga is able to actively accumulate potassium from its reserves in the soil. However, it has been noted that intensive fertilization of the soil with potash fertilizers can contribute to a greater development of clubroot.
Rutabaga, like turnip, responds positively to sodium fertilizer, and gives a higher yield with the joint application of potassium and sodium. According to experiments with rutabaga in England, when potassium was applied in a large dose, large root crops were formed, but with bitter and tough flesh, and with simultaneous enrichment of the soil with potassium and sodium in large quantities, the rutabaga was large with soft, sweet flesh.
Seedling care.
It consists of timely measures to control pests and diseases, loosening the soil between rows and in rows, removing weeds, thinning to a distance of 3-4 cm in places where plants stand densely, watering as needed, and 1-2 feedings (the first – 6-7 days after the emergence of seedlings, the second – 10-15 days after the first). For the first feeding, take 20 g of ammonium nitrate, 20 g of superphosphate, and 10 g of potassium salt per 10 liters of water, for the second – 20 g of each fertilizer. You cannot get carried away with an excessive amount of nitrogen in the top dressing, as in the case of a cold spring it will contribute to the appearance of flowering plants. In addition, you can get seedlings with elongated internodes, especially in the lower part, which causes greater overgrowth of the crown and obtaining root crops with an elongated shape uncharacteristic of the variety.
Seedlings are planted when their 4th-5th true leaf begins to appear, and the main root in the upper part will have a thickness of 3-4 mm.
The planting time for rutabaga coincides with the planting of seedlings of mid-late cabbage varieties – at the end of May. When planting seedlings, there should be no gap between the pre-planting soil preparation and the planting of plants in a permanent place. Planting should be done in cloudy weather if possible. In case of dry sunny weather, rutabaga should be planted in the afternoon, or better – in the evening. Seedlings are thoroughly watered the day before planting or early in the morning. The plants are selected by digging them up with a scoop or trowel so that the root system is more fully preserved. Before selecting seedlings, it is necessary to check whether there are cabbage fly larvae on the rutabaga roots. If they are found, the seedling roots are washed (washing away the larvae) in water. Heavily damaged plants are discarded, and the rest are dipped in a solution of mullein with clay. When planting in dry, hot weather, large leaves are partially cut off a day before seedling selection. This reduces water evaporation and promotes better seedling rooting. On the garden bed, the plants should be planted at the same depth at which they grew in the nursery. When planting, you must not bend the taproot, break it off high, or bury the heart of the seedling. Seedlings planted too deeply can die from silting up and necrosis of the heart (central leaves). Severe tearing and other damage to the main root promotes the growth of thick lateral roots, and large accumulations of coarse tissues are formed in the flesh of the root crop from this. Seedlings are planted with row spacings of 45 cm on a flat surface, less often – 60 cm, on ridges – 60 cm, on raised beds – in two or three rows with a distance between them of 35 cm or 45 cm. In the row, the plants are placed, regardless of the surface shape, at a distance of 20-30 cm. With manual planting in a garden plot, plants can be placed in a nested way with a distance between nest centers of 40x60 cm or 50x60 cm, planting 2-3 plants per nest. Planting must be combined with watering, pouring 0.5 liters of water under each plant, and then the seedling is lowered into the resulting gruel and covered first with moist, and on top – with dry soil. In dry weather, 1-2 days after planting, rutabaga is watered, and then when the top layer of the soil dries out, it is loosened. A week after planting, the survival rate of seedlings is checked and, if necessary, replanting is done in place of dead plants, having previously loosened and watered the holes.
Plant care.
Care for rutabaga crops includes loosening the soil in the row spacing, destroying weeds, thinning seedlings, applying top dressing, watering, and controlling pests and diseases. The soil must be kept in a loose (especially in the top layer), moist, and weed-free state. A soil crust formed after heavy rain is very dangerous for germinating seeds. If it appears before germination, the crops are immediately loosened with a light rake.
The first loosening of the row spacing is carried out to a depth of 4-6 cm immediately after the emergence of seedlings or on the second day after planting seedlings; the second – 7-10 days after the first. The row spacings are processed 2-4 more times with intervals of 10-15 days until the leaves close in the rows. You should loosen not only the surface of the bed, but additionally, you need to cultivate the bottom of the furrow between the beds 1-2 times. This helps preserve moisture and destroys weeds. Light soils, as well as dry ones, are loosened less often and shallower than heavy and damp ones forming a soil crust. Deep loosening (7-10 cm) near the plants is unacceptable, as the lateral roots are damaged. It should be carried out only in the middle of the furrows to improve air access and control weeds. For inter-row processing of rutabaga in a personal plot, ordinary hoes and various flat cutters are used. Weeds should be pulled out and destroyed by multiple loosening at the very beginning of their development. Timely and thorough thinning of rutabaga is one of the mandatory techniques for obtaining a harvest of good quality.
The dense standing of rutabaga plants for the first 15-20 days causes excessive stretching of the seedlings. In the future, this leads to greater overgrowth of the crown and coarsening of the flesh. The first thinning of crops is done no later than the beginning of the appearance of the third true leaf. You can do blocking. To do this, with an ordinary sharp hoe, directing it across the row, cut down extra plants, leaving small groups at a distance of 12-15 cm from one another. The second final thinning of rutabaga crops with weeding in the rows is done 10-20 days after the first, when the 5-6th leaf begins to appear on the plants. Thin out using a narrow hoe or manually after rain or watering. One plant (the best of the group) is left in the row at a distance of 15-18 cm. For rutabaga, it is preferable to leave large plants (but not tall ones due to a larger hypocotyl) with a dense rosette of leaves to grow root crops without crown overgrowth. Plants removed during thinning can be used as seedlings.
In fertile areas with stable, fairly high soil moisture, the feeding area for plants should be left smaller than under worse rutabaga cultivation conditions. If it is necessary to grow root crops in a shorter period, then the distance between plants should be left greater, as this favors their growth and accelerates the formation of root crops.
Top dressing.
They increase the yield of rutabaga. During the growing period, it is fed 1-2 times: after the second thinning and before the rows close. Liquid top dressing with organic and mineral fertilizers has the best effect. Feces must not be used for feeding. Liquid manure, or even better, fermented grass (living manure) is diluted with water 4-5 times and used for the first feeding. You can apply a mixture of mineral fertilizers at the rate of: 5-7 g of ammonium nitrate, 10-15 g of superphosphate, and 5-7 g of potassium salt per 10 liters of water.
* Rutabaga soup.
Cut the rutabagas into slices, put them together with the peeled potatoes in the meat broth and cook until tender. Fill with sour cream.
3 rutabaga, 6 potatoes, 3 litres of broth, sour cream - to taste.
* Milk soup with swede.
Wash the rutabagas, put them in a saucepan with cold water, bring to a boil, remove, finely chop and put them back in a saucepan with boiling water. Pour buckwheat, and add finely chopped raw potatoes and butter. Salt. When the swede is almost cooked, pour in the milk and cook until tender.
3 rutabagas, 4 cups of water, 6 cups of milk, 1/2 cup of buckwheat, 5 potatoes, 100 g of butter, and salt to taste.
* Rutabagas with meat.
Put the meat in boiling water and cook until half cooked, adding bay leaves, roots and onions. Prepared turnips and potatoes cut into small cubes and together with chopped cubes of meat, marjoram, caraway seeds and salt, dipped into strained broth. Boil in a sealed container. At the end of cooking, add flour diluted with cold water. Sprinkle with chopped parsley before serving.
500 g of pork or lamb, 1.5 l of water, 1 bay leaf, 5 roots, 2 onions, 750 g of swede, 500 g of potatoes, 1 teaspoon of marjoram, 1/2 teaspoon of cumin, 1 tbsp. a spoonful of flour, salt, and chopped parsley - to taste.